#ESP8266 ColorChord
(based off of ESP8266 I2S WS2812 Driver)
This project is based off of the I2S interface for the mp3 player found here: https://github.com/espressif/esp8266_mp3_decoder/
If you want more information about the build environment, etc. You should check out the regular WS2812 driver, found here: https://github.com/cnlohr/esp8266ws2812i2s
WARNING: This subproject is very jankey! It's about stable, but I don't think it's quite there yet.
Unfortunately the I2S Out (WS2812 in) pin is the same as RX1 (pin 25), which means if you are programming via the UART, it'll need to be unplugged any time you're testing. The positive side of this is that it is a pin that is exposed on most ESP8266 breakout boards.
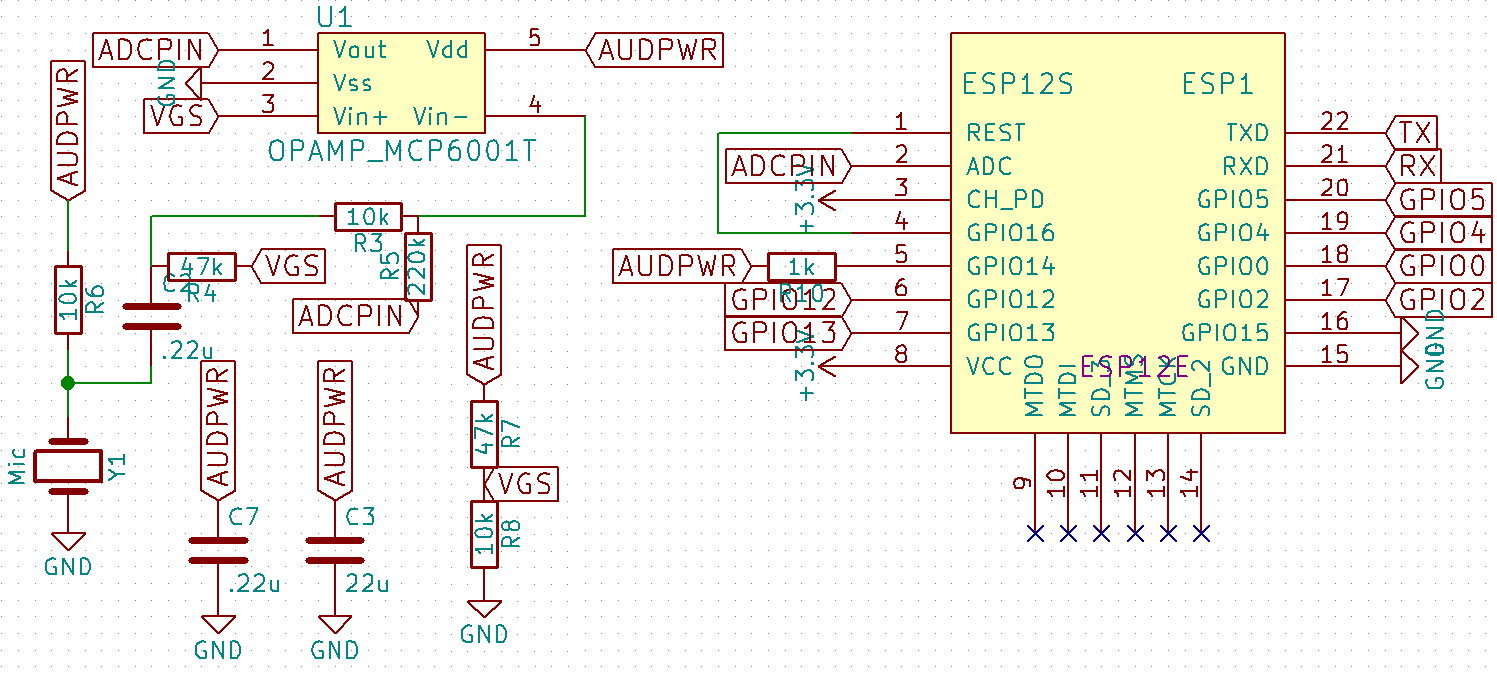
The audio data is taken from TOUT, but must be kept between 0 and 1V.
An option that has been thoroughly tested is for use with the 2019 MAGFest Swadge. https://github.com/cnlohr/swadge2019
Audio portion:
./makeconf.inc has a few variables that Make uses for building and flashing the firmware.
Most notably the location of the toolchain for the esp8266/85 on your system.
You should edit them according to your preferences or better add export ESP_ROOT='/path/to/the/esp-open-sdk' to your bashrc.
If you have problems with burning the firmware or transfering page data over network (make netburn or make netweb), you should try uncommenting
OPTS += -DVERIFY_FLASH_WRITE
in makeconf.inc. This way the esp checks if the flash is written correctly.
Especially with some ESP-01 modules there has been a problem with the flash
not being written correctly.
To build colorchord for the esp8266, you first must install the development tools for the esp8266 so that you can compile the code and flash it to the device.
Follow the instructions in Charles' getting started video to install the toolchain (up until about 3:30 into the video).

The instructions shown in the video are from the esp82xx repo on github.
TLDR version: You should really watch the video and look at the other instructions though.
- if you are on Windows you need to install WSL1 (Windows Subsystem for Linux version 1).
- Install Python2 and Make
- Install pip (for Python 2)
- Install pyserial (for Python 2)
- Install Charles' prepackaged toolchain to the
~/esp8266directory (esp8266directory in your home folder). - Set the
ESP_ROOTenvironment variable in your.profileor.bashrcfile. Check to see if one of these files exist (they are hidden by default), if one of them does exist, edit it adding the following line to the file.
export ESP_ROOT=$(HOME)/esp8266/esp-open-sdk
At this point you should have your development toolchain set up, now we will download and install colorchord.
Start by cloning this git repository, in a terminal window use the command
git clone https://github.com/cnlohr/colorchord.git --recurse-submodules
This will download the source code for colorchord and all of its dependencies.
Next, move to the embedded8266 directory so that we can compile the version of colorchord for the esp8266.
cd colorchord/embedded8266
Now we will need to build colorchord, this step will need to be done if you make any changes to the colorchord code.
make all
Hopefully the previous command completed without errors, if it did not, please refer to the common problems section. If all went well, there should be three binary files in your build directory image.elf, image.elf-0x00000.bin, and image.elf-0x10000.bin. You can check this with the command
ls -l image.elf*
Before flashing the program to the esp8266 it must be connected to the computer over a usb-to-serial connection and the correct port on the computer must be known. If using Windows (WSL) this will be the COM port shown by Windows Device Manager. For example, COM4 in Windows will refer to /dev/ttyS4 in WSL (See 2:35 from the previously mentioned video). On a Linux machine it will most likely be /dev/ttyUSB0. The file determined here will specify the PORT value in later commands, so if you had COM4, then PORT would be /dev/ttyS4.
If this is your first time using the esp8266 module with colorchord run the following command.
PORT=<port value> make erase
PORT=<port value> make burnitall
These two commands erase the contents of esp8266 memory and flash the program (and some base files) to it.
If you have made some changes to colorchord and you want to test them use the command
PORT=<port_value> make burn
If all went well, the esp module should be broadcasting a wifi access point that you can connect to. Once that is done, you should be able to see the colorchord webpage dashboard at the ip address 192.168.4.1. That should be it! Enjoy using colorchord, and don't hesitate to reach out if you have any issues.
Under Construction
If you experience any issues building colorchord embedded, please open an issue and we will try and work through it. I will try and keep this section up to date with relevant information.