This is a navigation jetpack architecture components sample in kotlin.
apply plugin: 'androidx.navigation.safeargs'

android{
compileOptions {
        sourceCompatibility JavaVersion.VERSION_1_8
        targetCompatibility JavaVersion.VERSION_1_8
    }

    kotlinOptions {
        jvmTarget = JavaVersion.VERSION_1_8.toString()
    }
}

dependencies {
implementation 'androidx.navigation:navigation-fragment-ktx:2.2.1'
implementation 'androidx.navigation:navigation-ui-ktx:2.2.1'
}dependencies {
classpath 'android.arch.navigation:navigation-safe-args-gradle-plugin:1.0.0'
}To add a navigation graph to your project, do the following:
- In the Project window, right-click on the res directory and select New > Android Resource File. The New Resource File dialog appears.
- Type a name in the File name field, such as "nav_graph".
- Select Navigation from the Resource type drop-down list, and then click OK.
<androidx.constraintlayout.widget.ConstraintLayout
        android:layout_width="match_parent"
        android:layout_height="match_parent"
        tools:context=".activities.MainActivity">

        <fragment
            android:id="@+id/nav_host_fragment"
            android:layout_width="0dp"
            android:layout_height="0dp"
            app:layout_constraintBottom_toBottomOf="parent"
            app:layout_constraintLeft_toLeftOf="parent"
            app:layout_constraintRight_toRightOf="parent"
            app:layout_constraintTop_toTopOf="parent"
            android:name="androidx.navigation.fragment.NavHostFragment"
            app:defaultNavHost="true"
            app:navGraph="@navigation/nav_graph"/>

</androidx.constraintlayout.widget.ConstraintLayout>To add a new destination using the Navigation Editor, do the following:
- In the Navigation Editor, click the New Destination icon , and then click Create new destination.
- In the New Android Component dialog that appears, create your fragment.
Output will be
<?xml version="1.0" encoding="utf-8"?>
<navigation xmlns:android="http://schemas.android.com/apk/res/android"
    xmlns:app="http://schemas.android.com/apk/res-auto"
    xmlns:tools="http://schemas.android.com/tools"
    android:id="@+id/nav_graph"
    app:startDestination="@id/employeesListFragment">

    <fragment
        android:id="@+id/employeesListFragment"
        android:name="com.example.navigationjetpacksample.fragments.EmployeesListFragment"
        android:label="EmployeesListFragment"
        tools:layout="@layout/frag_employees_list"/>
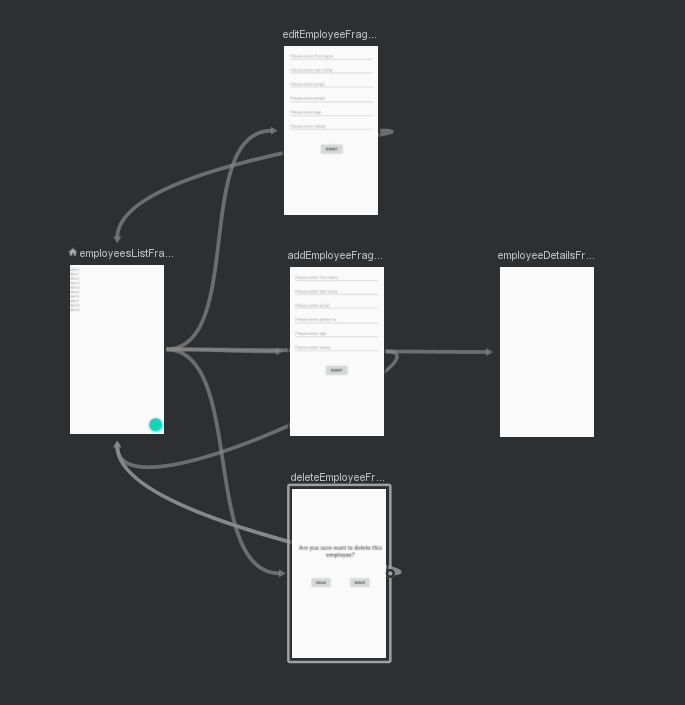
</navigation>You can use the Navigation Editor to connect two destinations by doing the following:
- In the Design tab, hover over the right side of the destination that you want users to navigate from. A circle appears over the right side of the destination
- Click and drag your cursor over the destination you want users to navigate to, and release. The resulting line between the two destinations represents an action
Output will be
<?xml version="1.0" encoding="utf-8"?>
<navigation xmlns:android="http://schemas.android.com/apk/res/android"
    xmlns:app="http://schemas.android.com/apk/res-auto"
    xmlns:tools="http://schemas.android.com/tools"
    android:id="@+id/nav_graph"
    app:startDestination="@id/employeesListFragment">

    <fragment
        android:id="@+id/employeesListFragment"
        android:name="com.example.navigationjetpacksample.fragments.EmployeesListFragment"
        android:label="EmployeesListFragment"
        tools:layout="@layout/frag_employees_list">
        <action
            android:id="@+id/action_employeesListFragment_to_employeeDetailsFragment"
            app:destination="@id/employeeDetailsFragment" />
        <action
            android:id="@+id/action_employeesListFragment_to_addEmployeeFragment"
            app:destination="@id/addEmployeeFragment" />
        <action
            android:id="@+id/action_employeesListFragment_to_editEmployeeFragment"
            app:destination="@id/editEmployeeFragment" />
        <action
            android:id="@+id/action_employeesListFragment_to_deleteEmployeeFragment"
            app:destination="@id/deleteEmployeeFragment" />
    </fragment>

</navigation>Kotlin:
- Fragment.findNavController()
- View.findNavController()
- Activity.findNavController(viewId: Int)
Java:
- NavHostFragment.findNavController(Fragment)
- Navigation.findNavController(Activity, @IdRes int viewId)
- Navigation.findNavController(View)
 fab_add.setOnClickListener {
            it.findNavController().navigate(EmployeesListFragmentDirections.actionEmployeesListFragmentToAddEmployeeFragment())
}To pass data between destinations, first define the argument by adding it to the destination that receives it by following these steps:
- In the Navigation editor, click on the destination that receives the argument.
- In the Attributes panel, click Add (+).
- In the Add Argument Link window that appears, enter the argument name, argument type, whether the argument is nullable, and a default value, if needed.
- Click Add. Notice that the argument now appears in the Arguments list in the Attributes panel.
Output will be
<fragment
    android:id="@+id/employeeDetailsFragment"
    android:name="com.example.navigationjetpacksample.fragments.EmployeeDetailsFragment"
    android:label="EmployeeDetailsFragment"
    tools:layout="@layout/frag_employee_details">
    <argument
        android:name="employee"
        app:argType="com.example.navigationjetpacksample.models.Employee" />
</fragment>
For optional arguments
<fragment
    android:id="@+id/employeeDetailsFragment"
    android:name="com.example.navigationjetpacksample.fragments.EmployeeDetailsFragment"
    android:label="EmployeeDetailsFragment"
    tools:layout="@layout/frag_employee_details">
    <argument
        android:name="employee"
        app:argType="com.example.navigationjetpacksample.models.Employee"
        android:defaultValue="@null"
        app:nullable="true"/>
</fragment>
In your sending destination’s code
holder.itemBinding.root.setOnClickListener {
            val action = EmployeesListFragmentDirections.actionEmployeesListFragmentToEmployeeDetailsFragment(getEmployee)
            it.findNavController().navigate(action)
}
In your receiving destination’s code
val args : EmployeeDetailsFragmentArgs by navArgs()

    override fun onCreateView(
        inflater: LayoutInflater,
        container: ViewGroup?,
        savedInstanceState: Bundle?
    ): View? {
        val binding : FragEmployeeDetailsBinding = DataBindingUtil.inflate(inflater,
            R.layout.frag_employee_details,container,false)
        binding.employee = args.employee
        return binding.root
}To add animations to an action, do the following:
- In the Navigation editor, click on the action where the animation should occur.
- In the Animations section of the Attributes panel, click the dropdown arrow next to the animation you'd like to add. You can choose between the following types: Entering a destination Exiting a destination Entering a destination via a pop action Exiting a destination via a pop action
- Choose an animation from the list of project animations that appears.
Output will be
<fragment
    android:id="@+id/employeesListFragment"
    android:name="com.example.navigationjetpacksample.fragments.EmployeesListFragment"
    android:label="EmployeesListFragment"
    tools:layout="@layout/frag_employees_list">
    <action
        android:id="@+id/action_employeesListFragment_to_employeeDetailsFragment"
        app:destination="@id/employeeDetailsFragment"
        app:enterAnim="@anim/enter_from_right"
        app:exitAnim="@anim/exit_to_left"
        app:popEnterAnim="@anim/enter_from_left"
        app:popExitAnim="@anim/exit_to_right"/>
</fragment>