A boilerplate for Visual Studio Code C# solution .Net Core with unit tests.
In the following sections we present a step by step guide to setup a VS Code solution with libraries (Primes and Fibonacci), a console application (App) and unit tests (Primes.Tests and Fibonacci.Tests).
If you just want to check the final result, then jump to Quick Setup after the Installation.
Table of contents:
- Installation
- Quick Setup
- Commands List
- Folders structure
- Setup libraries and application projects
- Setup unit tests project
- Setup solution build
- .NET Core SDK
- Visual Studio Code (VS Code)
- Open VS Code and click on Extensions (last icon of left side bar or
Ctrl + Shif + X) - Install the extension “C# for Visual Studio Code (powered by OmniSharp”
Clone this repo and run the following commands in the root folder:
-
code .to open VS Code for this solution -
Type
Ctr + Shif + Bto build the solution -
Type
Ctr + F5to runAppproject -
Select the
Debugicon on left side bar and then.Net Core Xunt teststo run the unit tests.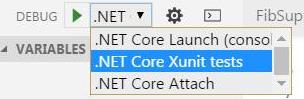
In this guide we use the following commands:
dotnet newto create an up-to-dateproject.jsonfile with NuGet dependencies.dotnet restore, which calls into NuGet to restore the tree of dependencies.dotnet buildto compile source files.dotnet <assembly.dll>to run the target application.
or:
dotnet runto run your application from the source code. Relies ondotnet buildto build source inputs before launching the program.code .to open Visual Studio Code for current location.
Create the following projects folders structure (NOTE: create only folders and not the files):
/<solution name>
|__global.json
|__/src
   |__/<library name>
      |__Source Files
      |__project.json
   |.../ Other libraries or applications
|__/test
   |__/<library name>.Test
      |__Test Files
      |__project.json
Each library , application, or unit test project will contain its own folder with its own project.json file inside it. In the next section we will initialize those project.json files.
- CD into library directory (e.g.
src/Fibonacci) - Run
dotnet new -t libto create the source project. - Check the
project.jsonwhich contains dependencies necessary to build the library. - Rename
Library.cs(e.g.FibSupplier.cs) - Open library C# file and rename the class according to the new file name (e.g.
class FibSupplier {…) - Rename the namespace according to the directory name (e.g.
namespace Fibonacci {…)
Repeat these steps for each library or application. For applications suppress the -t lib option on dotnet new command. Advice: You should create an application because it will simplify the build configuration in VS Code.
In boilerplate solution we have 3 projects in src folder, corresponding to Fibonacci, Primes and App.
NOTE: For small demos without unit tests this cheasheet finishes here. CD to your application folder and run dotnet restore, dotnet build and then dotnet run.
- For each project that depends of other projects you must refer those projects in the
dependenciesproperty ofproject.json. For instance, theproject.jsonofApphas the following dependencies:
"dependencies": {
  "Fibonacci": {"target": "project"},
  "Primes": {"target": "project"}
}
The following steps are optional because we will build the entire solution in the last section. However if you want to try each project individually you can follow next steps for each project:
- Run
dotnet restore, which calls into NuGet to restore the tree of dependencies. - Check the
project.lock.jsonfiles that contains a complete set of the graph of NuGet dependencies. - Run
dotnet buildto compile source files. - For applications run
dotnet runthat callsdotnet <assembly.dll>to run the target application (e.g.dotnet src/App/bin/Debug/netcoreapp1.0/App.dll)
Note: If your App refers all project libraries, then you just need to build the App project because dotnet build ensures to build target projects.
- CD into unit tests project directory (e.g.
test/Fibonacci.Tests) - Run
dotnet new -t xunittest. Check the generatedproject.json, which includes the test runner and dependencies forxunitanddotnet-test-xunitNuget libraries. - Rename
Tests.cs(e.g.FibSupplierTests.cs) - Open tests C# file and rename the class according to the new file name (e.g.
class FibSupplierTests{…) - Rename the namespace according to the directory name (e.g.
namespace Fibonacci.Tests{…) - Add the dependency to
Fibonacciproject. Editsrc/Fibonacci.Tests/project.jsonfile and add the property"Fibonacci": {"target": "project"}to thedependenciesobject that will look like Figure 1
The following steps are optional because we will build the entire solution in the last section. However if you want to try your tests follow next steps:
- In the root directory create a global.json that contains the names of your src and test directories (e.g. { "projects": ["src", "test"] })
- Run
dotnet restore, which calls into NuGet to restore the tree of dependencies. - Check the
project.lock.jsonfiles that contains a complete set of the graph of NuGet dependencies. - Run
dotnet buildto compile source files. - Execute
dotnet testto run the tests from the console. The xunit test runner has the program entry point to run your tests from the Console.dotnet teststarts the test runner, and provides a command line argument to the testrunner indicating the assembly that contains your tests.
"dependencies": {
  "System.Runtime.Serialization.Primitives": "4.1.1",
  "xunit": "2.1.0",
  "dotnet-test-xunit": "1.0.0-*",
  "Fibonacci": {"target": "project"}
}
Notice that you do not include any directory path to the Fibonacci project, because you created the project structure to match the expected organization of src and test. The "target": "project" element informs NuGet that it should look in project directories, not in the NuGet feed. Without this key, you might download a package with the same name as your internal library.
-
In the root directory create a
global.jsonthat contains the names of yoursrcandtestdirectories (e.g.{ "projects": ["src", "test"] }) -
Run
dotnet restore, which calls into NuGet to restore the tree of dependencies (you can skip this step if you have already run it individually for each project previously). -
Check the
project.lock.jsonfiles which appear on each project folder and contain a complete set of the graph of NuGet dependencies. -
Run
code .on root directory that will open the Visual Studio Code for your solution -
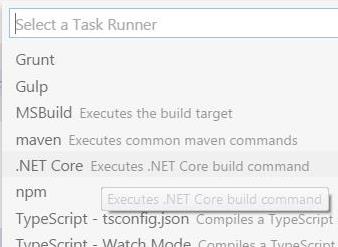
Create the task runner file (
.vscode/tasks.json) following one of the next options:- Option A: Click
Yesif appears the Warning messageRequired assets to build and debug are missing from….

- Option B: Type
Ctr + Shif + Band chooseConfigure Task Runnerand then.NET Core -- Executes .NET Core build command

- Option A: Click
-
Open
.vscode/tasks.jsonand add toargsarray the paths to your projects (e.g."${workspaceRoot}/src/App/project.json"(use\\in Wndows)). BecauseAppdepends of all other projects it will build theFibonacciandPrimesprojects first. -
If your solution includes an application (with property
"emitEntryPoint": trueinbuildOptionsofproject.json) then run your application withF5orCtr + F5(without debug). -
Add a new entry in
launch.jsonto run all your xunit tests. Add the following item toconfigurationsproperty oflaunch.json:
"configurations": [
      {
          "name": ".NET Core Xunit tests",
          "type": "coreclr",
          "request": "launch",
          "preLaunchTask": "build",
          "program": " /usr/local/share/dotnet/dotnet ",
          "args": ["test"],
          "cwd": "${workspaceRoot}/test/Fibonacci.Tests",
          "externalConsole": false,
          "stopAtEntry": false,
          "internalConsoleOptions": "openOnSessionStart"
      },
     …
]
For windows users in program set to C:\\Program Files\\dotnet\\dotnet.exe
- To run xunit tests select the
Debugicon on left side bar and then.Net Core Xunt tests-- this is the name you gave in step 8.
- You can run or debug each test individually by clicking on the corresponding option over each unit test method
